
what connects for corner for aluminum extrusion?
You’re building a frame from extruded aluminum and wonder why the corners wobble or misalign—noise, instability, mis‑fitting.
Corner joints in aluminum extrusion systems are connected using hardware such as corner brackets, gussets and hidden internal connectors that match the slot/series of the extrusion.
Let’s go through key corner‑joint questions: which fittings join corners, why stability improves with certain brackets, how to align 90‑degree joints properly, and how internal connectors can hide hardware yet still perform.
Which fittings join extrusion corners?
Struggling to pick the right hardware for a corner? That confusion slows down the build.
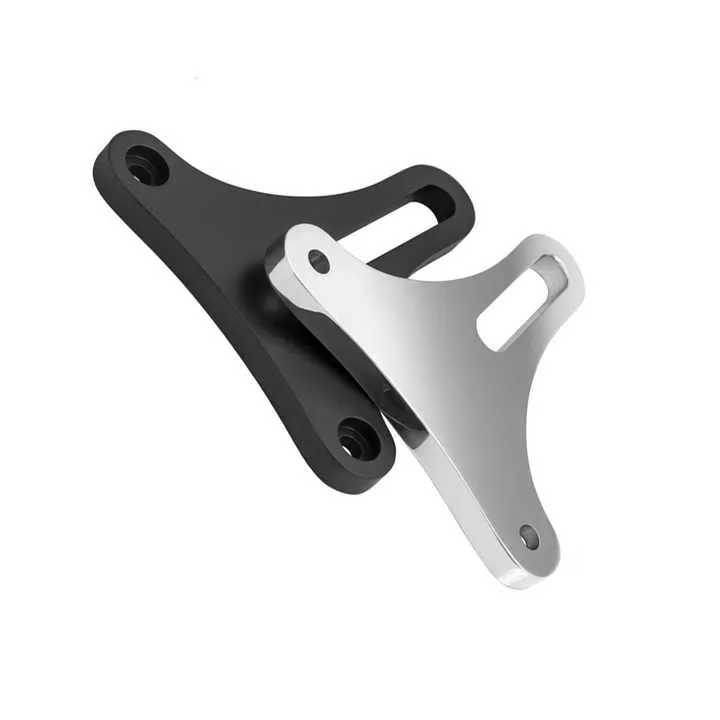
The common fittings for joining aluminum extrusion corners are L‑brackets (corner brackets), joining plates and gussets, sized to the profile slot and series.

When you build with extruded aluminum profiles (for example T‑slot systems), you need connectors that match the profile series, slot size, and load condition. For instance, many suppliers list “corner brackets, gussets & plates” specifically for aluminum extrusion joints.
Types of fittings
| Type | Description | Typical use |
|---|---|---|
| Corner bracket / L‑bracket | An angle bracket (two plates joined at 90°) that bolts to the profile faces or slots | Light to medium frames, quick assembly |
| Gusset plate | A triangular or reinforced plate that covers the corner, adding stiffness | Heavy loads, large frames |
| Joining plate / flat plate | A flat plate that spans two profiles side‑by‑side or back‑to‑back | Low‑profile joins, when appearance matters |
| Internal / hidden connector | A connector inserted inside a profile or slot so the exterior is clean | Aesthetic or enclosed builds |
What to look for
- Match the series (e.g., “2020”, “3030”, “4040” mm) and slot size (6 mm, 8 mm, etc).
- Material strength & finish: brackets may be aluminum alloy or zinc alloy; they should resist corrosion and deformation.
- Accessibility: can you access the slots or faces during assembly?
- Load direction: if you expect shear or torsion forces, choose gussets or reinforced brackets.
- Fit & adjustability: brackets that use sliding T‑nuts or drop‑in nuts allow repositioning and adjustment.
Practical recommendation
Since you are in B2B manufacturing with custom aluminum extrusions, you’ll often prefer:
- For standard frames: use matching L‑brackets sized to your extrusion series.
- For large spans or frames subject to vibration or load: use gusseted or reinforced corners.
- For premium appearance or where external hardware is undesired: plan internal connectors (see later).
Corner brackets are always enough for any load condition in aluminum extrusion frames.False
Basic corner brackets may not resist torsion or shear loads; with heavy loads gussets or reinforced brackets are needed.
Selecting a bracket that matches the profile slot size and series matters for joint strength.True
If the bracket or nut does not match the slot size or series, the joint may slip or weaken.
Why corner brackets improve stability?
If your frame flexes or twists under load, you’re likely missing proper corner reinforcement.
Corner brackets translate loose joints into rigid frames by distributing load across surfaces and resisting rotational or shear forces at the joint.

Stability in a frame built from aluminum extrusion is about more than simply bolting two profiles together. Even when two profiles meet at 90°, the joint must resist: vertical loads, horizontal shear, twisting (torsion), and forces that try to pull the joint apart.
How brackets help
- Load distribution: A bracket increases contact area between the profiles.
- Fixed angle: The rigid bracket maintains the 90° angle under load.
- Prevents rotation: Gusseted brackets resist torsion—important in tall or loaded frames.
- Ease of adjustment: Brackets let you pre‑position profiles for better accuracy.
Which bracket strength for you?
Consider:
- Profile size (10 mm to 400 mm)
- Expected loads
- Frame shape
- Dynamic vs static conditions
Table summary
| Scenario | Bracket type | Why |
|---|---|---|
| Light interior frame, low load | Basic L‑bracket | Quick, cost‑effective |
| Medium frame, some shear or lateral load | Gusset bracket | Resists shear/torsion better |
| Heavy frame, large span, dynamic loads | High‑capacity gusset or welded bracket | Maximises rigidity |
| Clean aesthetic required | Internal hidden connector + minimal visible bracket | Maintains appearance |
Using only basic L‑brackets in a large heavy‑duty industrial frame is sufficient.False
Basic L‑brackets may not resist large shear or torsional loads associated with heavy industrial frames; heavier reinforcement is recommended.
A well‑designed bracket connection reduces the risk of joint loosening over time.True
By distributing load and maintaining alignment, the bracket reduces stress‑concentration and movement, preventing loosening.
How to align 90-degree corner joints?
Even with good hardware, misaligned corners still cause problems—gaps, wobble, poor assembly.
Aligning 90° corner joints means accurate cutting, fixture clamping, use of angle‑plating or squares, and staged tightening of fasteners.

Alignment in building frames from aluminum extrusion is critical. If your corner is just a few millimetres out, the frame may distort or not fit panels.
Pre‑cut and check
- Measure profile length using caliper.
- Use machinist’s square for 90° cuts.
- Dry‑assemble before tightening.
Fixturing & clamping during assembly
- Use flat surface for layout.
- Use corner squares or plates for holding.
- Clamp and tighten in sequence.
Final check & maintenance
- Check corners with angle tool.
- Ensure faces are flush.
- Re‑check under load after assembly.
Table of alignment workflow
| Step | Action | Tool / Check |
|---|---|---|
| 1 | Cut profiles and verify length & squareness | Caliper / square |
| 2 | Dry‑assemble and check fit | Visual / feel |
| 3 | Clamp profiles using angle square | Angle plate & clamps |
| 4 | Insert fasteners loosely | Fasteners/T‑nuts |
| 5 | Gradually tighten across structure | Torque wrench |
| 6 | Final inspection of faces & angle | Square, feeler gauge |
| 7 | Post‑assembly re‑check after load | Visual / measurement |
Tightening all bolts immediately at maximum torque is the best way to achieve alignment.False
Immediate full torque can cause uneven stress and skewing; gradual tightening and sequence is better.
Using angle squares and clamps during assembly helps maintain true 90‑degree joins.True
Fixtures prevent shifting during fastening, preserving accurate alignment.
Can internal connectors hide hardware?
You want a sleek, polished frame for your extrusion but don’t want visible brackets or bolts showing.
Internal connectors fit inside the profile or slot so the external faces remain clean, while still providing strong corner joints.

Some industrial or finished applications require minimal visual disruption. Internal connectors are built for that.
How they work
- Slide inside profile slot or cavity.
- Clamp using bolts or set‑screws.
- External surfaces remain clean.
Advantages
- Clean, flush appearance.
- No external bracket edges.
- Can mount panels directly.
- Compact and low‑profile joints.
Considerations & trade‑offs
- Requires compatible profile slot.
- May need precise cuts or tapped holes.
- Access for disassembly is harder.
- Slightly more costly.
- May still need external support for heavy loads.
Suitability for your business
Use for:
- Visible frames or product enclosures
- Medium load applications
- Clean finish or panel integration
Hidden internal connectors eliminate the need for any external bracket for all load conditions.False
While internal connectors hide hardware, for heavy loads or torsion you may still need external reinforcement or gusseting.
Internal connectors are ideal when appearance is as important as structural performance.True
They allow clean exposed surfaces while providing joint strength, beneficial in visible frames or finished applications.
Conclusion
Joining corners in aluminium extrusion frames is manageable if you pick the right fittings, ensure proper stability, align accurately, and use internal connectors when appearance matters. With the right methods, your frames will be precise, strong and look professional.


