
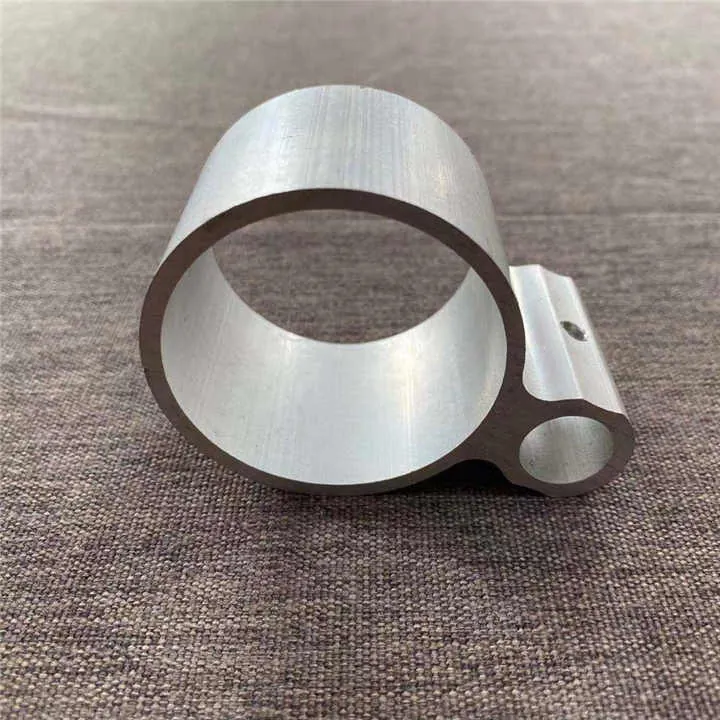
How to cleanly cut aluminum extrusion?
I often work with aluminum extrusion in my shop, and I’ve learned the hard way that without the right tools and technique I end up with ragged edges, burrs, and wasted material. In this article I’ll walk you through how to get clean, precise cuts every time.
With the right blade, controlled feed speed, minimal vibration and lubrication, you can achieve smooth, burr‑free cuts in aluminum extrusion.
What blades provide clean cuts?
When I first started cutting extrusion, I used a generic wood‑cut blade and it was a mess—chips, rough edges, and lots of deburring. The right blade makes a big difference.
Blades designed for non‑ferrous metals (especially aluminum) with carbide‑tipped teeth and high tooth count provide the cleanest cuts and minimize burrs.
Here are some great blade options:
- Evolution 12″ 80‑Tooth Aluminum Cutting Blade: Big size, high tooth count, designed specifically for aluminum and other non‑ferrous metal — ideal when you have long extrusion lengths or bulk cuts.
- Vortex Diamond Carbide Tipped Circular Saw Blade (Aluminum): A more budget friendly smaller size, still carbide tipped and suitable for aluminum extrusion.
- Milwaukee 10″ Aluminum Cutting Circular Saw Blade: 10‑inch size, 72 teeth — good mid‑size option for workshop use with enough room for larger profiles.
- Amana 10″ 80‑Tooth Carbide Tipped Aluminum/Non‑Ferrous Blade: Higher tooth count (80+) in that 10‑inch diameter, which helps with smoother finishes on extrusion.
- Crescent 7‑1/4″ 60‑Tooth Medium Aluminum Circular Saw Blade: A jobsite size (7‑1/4″) but still carbide and optimized for aluminum — good when you’re using smaller saws.
- Milwaukee 9″ 72‑Tooth Aluminum Cutting Circular Saw Blade: Slightly smaller than 10″, still plenty of teeth, good for moderate size profiles.
- Crescent 5‑3/8″ 50‑Tooth Carbide Circular Saw Blade (Aluminum): Compact size — good when space is limited or making many short cuts.
- Diablo 10″ × 60‑Tooth Aluminum Cutting Saw Blade: Another 10″ option with good specs for aluminum — a viable alternative.
Why these specs matter
- High tooth count (60‑80+ teeth) = finer finish, less tearing/burrs.
- Carbide‑tipped blades are more durable and better for metals than standard blades.
- Dedicated non‑ferrous blades reduce heat build‑up and provide smoother cuts.
My personal tip
I always match the blade diameter and tooth count to the size of extrusion I’m cutting. For small profiles (say 20 mm × 20 mm) I might use a 50‑60 tooth blade in a smaller saw. For larger profiles I go with a 10‑12″ blade with 80 teeth. I make sure the blade is tight, clean, and designed for aluminum.
Why feed speed influences finish?
Feed speed — how fast you push or feed the material into the blade — plays a huge role in how clean the cut is.
If you feed too fast, the blade will chatter, heat will build up, the material may deform or the cut will have burrs. Conversely, feeding at a controlled slower rate yields smoother, cleaner edges.
What happens when feed speed is too fast
- The blade teeth grab the metal, causing vibration or chatter — this can lead to rough edges or wave patterns on the cut face.
- High friction means high heat, potential melting or softening of aluminum, leading to tear‑out or deformation.
- The extrusion may shift or move if not perfectly secured, compounding the effect of too fast a feed.
What happens when feed speed is appropriate
- Each tooth removes a consistent chip size; less vibration; better finish.
- Less heat builds up; blade stays cooler and lasts longer.
- The material has time to react and the blade cuts cleanly rather than tearing.
Practical Feed Speed Techniques
- Start slowly: before you begin full cut, make a test cut on scrap to judge how the blade responds.
- Observe the finish: if you’re getting dark discoloration, dragging, or loud chatter — slow down.
- Use steady, even pressure — don’t force the blade through. Let the blade do the work.
- For thick or dense profiles, feed slower than thinner ones.
- Use material supports on in/out sides so the piece doesn’t bind or drop when the cut finishes (which can affect feed).
My experience
I once tried to fly through a long 2000 mm aluminum extrusion piece with a 10″ blade at my usual wood‑cut speed. The result: hot chips, burrs, and a heat‑discolored edge. After slowing the feed to half my normal rate and switching to a dedicated aluminum blade, the finish was almost mirror‑smooth and required only light deburring.
Slower feed speed when cutting aluminum extrusion results in smoother cuts and less burr formation.True
Industry guides recommend slower, controlled feed rate for aluminum to avoid heat build‑up and rough edges.
Faster feed speed increases productivity and always gives an acceptable finish for aluminum extrusion.False
Faster feed leads to heat, deformation, rough edges and may degrade cut quality in aluminum extrusion.
How to minimize vibration during cutting?
Vibration is one of the sneaky enemies of a clean cut. It causes chatter, uneven surfaces, and puts extra wear on blades and equipment.
Minimizing vibration means better edge quality, less blade damage, and a safer process overall.
Key vibration sources
- The workpiece (aluminum extrusion) not firmly clamped or supported. If the profile shifts or resonates, the blade will vibrate.
- The saw mount or workstation has too much flex or play.
- The blade itself is not appropriate (low tooth count or not for metal) and is flexing under load.
- Blade supports (flanges, arbor, run‑out) are loose or misaligned.
- Feed is uneven or forced, which can cause the blade to wobble or skip.
How to control vibration
Clamping & Support
- Make sure the extrusion is firmly clamped or held down.
- Support both sides of the cut — feed side and out‑feed side — so the extrusion doesn’t drop or twist.
- Use supports or rollers if you are cutting long lengths to prevent sagging.
Saw & Blade Setup
- Use a saw bench or stand that is rigid and level. Avoid cutting on a flimsy table that bounces.
- Use the correct blade: high tooth count, designed for aluminum, properly tensioned.
- Check blade run‑out (wobble) and replace if blade is bent or damaged.
- Use blades with anti‑vibration slots or damping design if available.
Feed Technique
- Apply even, steady feed pressure — don’t push hard or fast.
- Listen to the sound: if you hear ringing or loud chatter, pause and adjust.
- At the end of the cut, support the off‑cut so it doesn’t drop suddenly which can jolt the blade and cause chatter.
My personal workflow
- Before each session I clean the saw table and check all bolts on the saw and clamps.
- For long extrusions I set up a roller support on the out‑feed side so the piece rides smoothly and doesn’t drag or twist.
- I inspect the blade each morning — a small nick or bent tooth can add vibration quickly.
- I also monitor the cut finish: if I see subtle “waves” or consistent tiny burrs around the periphery, I know vibration or feed speed were too aggressive.
Vibration of the extrusion or blade during cutting directly degrades the cut finish quality.True
Movement or vibration during cutting causes chatter, uneven surfaces and rough edges.
As long as the saw is turned on, vibration does not affect the quality of the aluminum extrusion cut.False
Even with the saw running, if the workpiece or blade vibrates or is unstable, the cut quality will suffer.
Can lubrication improve cut smoothness?
Yes — and this is often overlooked in smaller shops. Lubrication or cooling during aluminum extrusion cutting can significantly improve finish, reduce burrs, and extend blade life.
Applying a suitable lubricant or cutting fluid (or even wax) reduces friction and heat during the cut, leading to smoother edges and less wear on the blade.
Why lubrication matters
- Aluminum is relatively soft and tends to smear or drag under heat/friction rather than cleanly shear.
- High friction builds heat which can cause the extrusion surface to melt slightly or deform, causing warping, discoloration, and rough edges.
- Lubricant reduces temperature, helps chips evacuate easier, and reduces potential binding or tooth gumming.
- Also helps for larger batch cuts — when you are doing many pieces in a row, heat builds cumulatively, so lubricant gives you extra margin.
Types of lubrication methods
- Cutting wax stick: You rub the blade lightly through a wax stick before each cut or every few cuts.
- Spray lubricant/cutting oil: Light spray on the blade and maybe the extrusion surface. Some caution about making a mess, but it helps.
- Wet/coolant systems: For heavy industrial setups (not always practical in a basic workshop) you might have flood coolant or mist. The principle is the same: lower heat, clear chips.
My recommendations
- For most shop use, I use a wax stick and touch‑up spray every 10‑20 cuts.
- I wipe the extrusion surface lightly if it has oil or debris before cutting (especially if anodized) because old oils may burn or smoke which degrade finish.
- If working in long runs or thicker profiles, I consider adding a mist spray setup or labelling “use lubricant” in the procedure.
- I also clean the blade regularly — built‑up aluminum on the blade can hamper cut quality and reduce benefit of lubricant.
Using lubrication when cutting aluminum extrusion improves finish quality and extends blade life.True
Using lubricant reduces heat and friction, resulting in smoother cuts and less wear.
Lubrication is unnecessary when cutting aluminum extrusion if you are only making a few cuts.False
Even for a few cuts, lubrication reduces risk of burrs and improves finish quality.
Conclusion
Cutting aluminum extrusion cleanly takes attention to detail in tool selection and technique. Use a carbide‑tipped, high‑tooth‑count blade made for non‑ferrous metals. Control your feed speed so you don’t build heat or disorder the cut. Clamp and support your workpiece to reduce vibration, and don’t neglect lubrication — it really does improve finish and blade lifespan. With those four pillars in place, you’ll consistently get sharp, straight, burr‑free cuts and save yourself time and material in your projects.


