
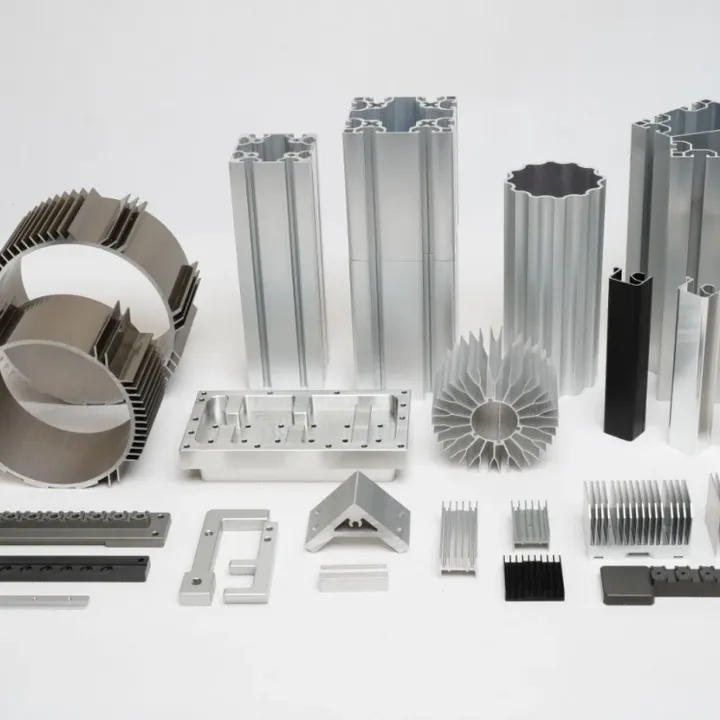
How do you make Custom Aluminum Extrusions?

I know how hard it is to find clear guidance on making custom aluminum extrusions. You need a simple guide that explains each part.
You can learn how to pick materials, design a shape, and run quality checks in a clear way.
Let me walk you through the process step by step. You will get a full view from idea to finished part.
What materials are needed to produce custom aluminum extrusions?
I start by choosing the right aluminum grade and billet. You need to match strength and finish needs.
You need a billet like 6063-T5 or 6061-T6 and possibly coatings like anodizing.
Dive deeper
I often begin with choosing the aluminum alloy. The common alloys for extrusions are 6063 and 6061.
- 6063 is easier to extrude. It accepts anodizing well. It gives good strength and looks clean.
- 6061 is stronger. It works well when parts need to bear more load or handle stress.
Next, I pick the billet size. Billets come in 500?mm to 600?mm diameters. The length matches the extruder capacity. Billets need heating before extrusion. The usual temperature is 450–480?°C. Heating ensures the material flows well through the die.
Then I consider coating or finishing. Many customers want anodized surfaces. Anodizing needs extra materials like acid baths, dyes, and sealers. Other finishes include powder coat, wood grain, or painting. Each finish needs its own setup and chemicals.
We can summarize alloys and finishes:
| Alloy | Main strength | Best use case |
|---|---|---|
| 6063 | Medium | Window frames, panels |
| 6061 | High | Structural parts, frames |
| Finish | Chemicals needed | Surface effect |
|---|---|---|
| Anodizing | Sulfuric acid, dyes, sealer | Durable, clean oxide |
| Powder coating | Powder, curing oven | Thick, even color |
| Wood grain | Film, heat press | Natural wood look |
Here is a checklist I follow:
- Choose alloy based on end use.
- Pick billet size to match press.
- Decide on surface finish.
- Order raw materials.
Materials are the foundation. If you pick wrong alloy or finish early, you risk delays or failures on large orders.
6061 alloy is stronger than 6063 alloy.True
6061 has a higher tensile strength and is suited for load-bearing applications.
Anodizing uses powder coat chemicals.False
Anodizing uses acid baths and dyes, not powder coating chemicals.
What steps are involved in designing a custom extrusion profile?
I start with the part design. First, I gather customer needs. Then I draw a profile in CAD. Next, I check wall thickness and tolerances. Finally, I test the profile using software or prototypes.
Designing begins with CAD drawings, simulation, and mold die planning.

Dive deeper
When I begin design, I sit with the customer. I ask what the part will do. This helps me list key features. For example: hollow channels, slots, strength ribs, mounting flanges. Each feature affects the die complexity and cost.
Then I create a CAD outline of the cross section. I draw accurate geometry. I show dimensions and tolerances. I use standard units. I avoid overly complex shapes that create defects or die tool wear.
After CAD, I check wall thickness. Walls thinner than 1.5?mm are risky. They may crack or cool too fast. Thicker than 10?mm may cause slow extrusion. I adjust thickness and add ribs or webs. This keeps the part lightweight yet strong.
Then I run a flow simulation. This uses software to show how metal flows in the die. It can show stress points or thin areas. With this info, I tweak the profile. I adjust the design to balance flow and strength.
Once I have a stable design, I prepare the die drawing. The die is the metal tool that shapes the aluminum. It needs machining drawings for a toolmaker. The die must match the profile with tight tolerances (±0.05?mm). I also specify finish on die surfaces.
Then I order prototype extrusion. Some runs use soft tooling or a first-draft die. I produce 100–200?meters. I check dimensions and surface quality. Then I refine the die if needed.
Here is a process overview:
| Step | Purpose |
|---|---|
| Requirements analysis | Know customer needs |
| CAD drawing | Create precise profile shape |
| Wall/tolerance check | Ensure manufacturability |
| Flow simulation | Avoid defects and weak spots |
| Die design | Prepare tools for extrusion |
| Prototype run | Verify real-world performance |
| Tool/Hole features | Notes on effect |
|---|---|
| Ribs/Webs | Strength without weight |
| Channels/Slots | Mounting or inserts |
| Curves/Rounded edges | Reduce stress concentration |
For complex profiles, I may go through two or three prototype runs. This is normal. It improves die life and part consistency. Without proper design, you risk scrap, cost overruns, and delays.
Wall thickness below 1.5?mm is ideal for extrusion.False
Very thin walls below 1.5mm are risky and may cause defects or cracking.
Flow simulation helps prevent defects before die making.True
Simulation identifies flow issues and stress points early in design.
How long does it take to manufacture custom aluminum extrusions?
I run through design, tooling, extrusion, and finishing. The full cycle can take 4 to 8 weeks for first samples. Production timing depends on complexity and batch size.
A typical lead time is 4–8 weeks from initial design to delivered extrusions.
Dive deeper
First, design and tooling take time. CAD drawing and simulation may take 5–7 days. Designing the die and getting quotes may add another week. If tooling needs special features, it may take longer.
Die manufacturing takes 2–3 weeks in a tool shop. Simple dies cost less and are faster. Complex dies with many cavities and tight tolerances take longer.
After tooling, I run a prototype. This takes 1–2 weeks. We test dimensions, surface, and finish. If adjustments are needed, each die revision adds another week. Two revisions could add 2–3 weeks.
Once the die is finalized, we start full production. Each extrusion press runs a test pass. Then we extrude the full order. We can run 300–600?kg per hour depending on size and alloy. For a 10-ton order, throughput may be 20–30 hours of run time. We may spread the run over 2–3 days.
After extrusion, we age the profiles. Aging or heat treatment takes 8–12 hours. Aging brings tensile strength and hardness to the material.
Next, we cut and finish. Cutting and surface treatment may take 7–10 days. Surface finish steps include cleaning, anodizing, sealing, or coating. Batch drying and inspection add time.
Finally, packing, labeling, and shipping need another 3–5 days. International shipping adds more days. Air freight may take 3–5 days. Sea freight can take 20–30 days.
Overall timeline table:
| Phase | Time Estimate |
|---|---|
| Design and simulation | 1–2 weeks |
| Die manufacturing | 2–3 weeks |
| Prototype run & revision | 1–3 weeks |
| Production extrusion | 2–4 days |
| Aging, cutting, finishing | 2 weeks |
| Packing and shipping | 1–4 weeks |
If you need a rush order, I can simplify the die, reduce prototype loops, or use faster shipping. You can cut to 3–4 weeks, but cost will go up.
Prototype revision adds no extra time.False
Each prototype revision typically adds one week or more to the timeline.
Faster shipping can reduce total lead time.True
Using air freight or express courier shortens transit time significantly.
What quality checks ensure precision in custom aluminum extrusions?
I keep tight quality checks at each step. These include die trials, dimensional inspection, mechanical testing, and surface checks.
Quality control includes die trial checks, measurements, alloy testing, and surface finish inspection.
Dive deeper
It all starts with incoming material checks. I open each billet and check certificate. I confirm alloy grade, temper, and size. I verify traceability by logging heat number and batch.
When the die is ready, I run a die trial. I extrude a small run. I then measure key dimensions. I check against drawing tolerances. Typical tolerance is ±0.1?mm for external, ±0.15?mm for internal features. If parts are out of spec, I adjust the die. I run trials until parts are correct.
During full runs, I sample every hour. I measure wall thickness and key distances using calipers or laser gauge. I keep a log of readings. It shows if the press is stable.
After extrusion, I age the parts. Then I check mechanical properties. I take tensile test samples per ASTM. I measure yield strength, tensile strength, and elongation. The results must meet the alloy standard (e.g. 6063?T5: tensile ~140?MPa, yield ~110?MPa). I record results in test certificates.
Surface finish inspection is next. I look for scratches, pits, or uneven coatings. For anodizing, I check film thickness. I use an X-ray gauge or periodic weight loss test. I testadhesion via tape test or bend test. If finish is not correct, we reprocess parts.
I also run corrosion tests sometimes, especially for outdoor or marine parts. I use salt spray or humidity chamber tests. Results help predict long?term durability.
All final parts go to final inspection. I make dimensional reports and pull samples. This ensures parts match the drawing and meet customer needs.
Quality steps summary:
| QC Step | Purpose |
|---|---|
| Incoming billet check | Confirm alloy and temper certificate |
| Die trial measurement | Ensure first parts are within tolerance |
| In?line sampling | Monitor process stability hourly |
| Mechanical testing | Validate strength meets standards |
| Surface inspection | Check finish quality and coating bond |
| Corrosion test (optional) | Ensure long-term durability |
| Final inspection and report | Confirm all requirements are met |
I document all QC data in a file. I attach test certificates and measurement charts. This forms a quality package for the customer.
Dimensional tolerance of ±0.1mm is common for external features.True
This tolerance is a standard target for precision extrusions.
We skip tensile testing on all lots.False
We test mechanical properties using sampled specimens to ensure alloy standards are met.
Conclusion
We covered materials, design, timing, and quality control. You can follow the steps from alloy choice to final inspection. This guide should help clients and manufacturers work well together.
If you want help with a custom extrusion project, I can support you end to end.

