
How to Use Aluminum Trim Strip?

Sometimes a small detail can make a big difference. Trim strips are one of those small details that transform the finish of a project.
You can use aluminum trim strips to protect edges, hide gaps, and add a neat finish. They are easy to cut, simple to install, and last for years.
When I first started using aluminum trim strips, I underestimated their impact. Soon I saw how they improved both the look and durability of my work. If you want the same results, let’s explore the details together.
What are the main Trim Strip types?
Many people buy aluminum trim strips without knowing which type will work best for their project.
The main types of aluminum trim strips are L-shaped, T-shaped, U-shaped, flat, and decorative profiles, each serving different functions in edging and finishing.
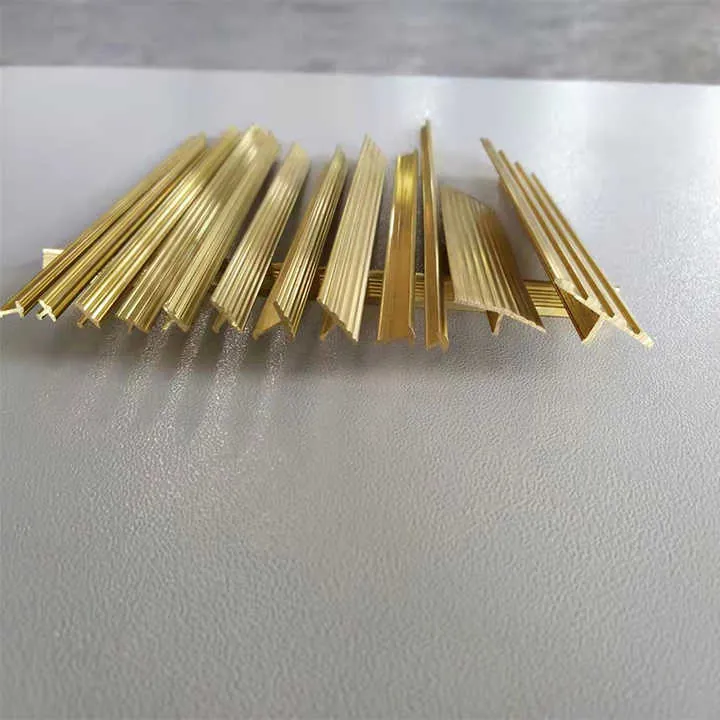
When I choose a trim strip, I start by matching its shape to the job. An L-shaped strip works well to cover outside corners. A T-shaped strip fits between two surfaces to hide seams. A U-shaped strip can protect the edge of a board or panel. Flat strips can cover joints or serve as decorative bands. Decorative profiles come in many patterns, and I use them when appearance is more important than protection.
Common Aluminum Trim Strip Types
| Type | Typical Use | Strength Level | Visual Appeal |
|---|---|---|---|
| L-shape | Outside corners, edge protection | High | Medium |
| T-shape | Between floor tiles, wall panels | Medium | Medium |
| U-shape | Panel edging, protective sleeves | High | Low |
| Flat | Seam covering, general decoration | Low | Medium |
| Decorative | Purely for looks, no heavy-duty protection | Low | High |
I also consider finish. Bright anodized aluminum looks clean and modern. Powder-coated strips give more color options. Wood-grain finishes can blend better with traditional interiors.
T-shaped aluminum trim strips are mainly used for covering outside corners.False
T-shaped strips are designed to hide seams between two surfaces, not for outside corners.
U-shaped aluminum trim strips are suitable for protecting panel edges.True
U-shaped profiles fit over edges to prevent damage and wear.
How do I prepare surfaces before installation?
If the surface is dirty or uneven, the trim strip will not stick well and might not sit flush.
Before installing aluminum trim strips, clean the surface, remove dust or grease, and make sure the base is flat and dry to ensure strong adhesion or fit.

Preparation is the most boring part of the job, but it matters the most. I once skipped cleaning the surface before installing a kitchen backsplash trim, and the adhesive failed within a week. Since then, I follow a simple checklist:
Surface Preparation Checklist
| Step | Why it Matters |
|---|---|
| Clean with soap | Removes dust, oil, and grime |
| Rinse well | Stops soap film from reducing adhesion |
| Dry fully | Prevents moisture from weakening glue |
| Sand lightly | Helps adhesives grip better |
| Remove debris | Avoids bumps under the trim |
For adhesive-backed trim, I often use rubbing alcohol for a final wipe. For mechanical installation with screws or nails, I make sure the substrate is solid. If it’s drywall, I locate studs first. If it’s metal or wood, I check for rot or rust.
Sanding the surface before installing trim can improve adhesion.True
A lightly roughened surface helps adhesives grip more effectively.
Moisture under the trim will help glue cure better.False
Moisture weakens most adhesives, leading to poor bonding.
Which tools make installation easiest?
The wrong tools can turn a simple job into a frustrating one.
The best tools for installing aluminum trim strips are a fine-tooth saw or metal snips for cutting, a measuring tape, level, drill, screws or adhesive, and safety gear.

When I install trim strips, I always measure twice and cut once. A fine-tooth saw gives me cleaner edges, but for thinner strips, metal snips work fine. If I need to make a lot of cuts, I sometimes use a miter saw with a non-ferrous metal blade.
My Go-To Tool List
| Tool | Purpose |
|---|---|
| Measuring tape | Accurate length measurement |
| Level | Ensures straight and even installation |
| Fine-tooth saw | Clean cuts on thicker strips |
| Metal snips | Quick cuts on thin strips |
| Drill + bits | For screws or rivets |
| Adhesive + applicator | For glue-based installations |
| Safety glasses | Protects eyes from metal shards |
I also keep a small file to smooth any rough cut edges. This stops sharp ends from scratching surfaces or hands. If I’m using adhesive, I choose one made for metal and the specific surface I’m bonding to, like tile, wood, or drywall.
A miter saw with a non-ferrous blade can be used to cut aluminum trim strips cleanly.True
This type of blade is designed to cut aluminum without tearing or bending it.
Metal snips are unsuitable for any aluminum trim cutting.False
Metal snips work well for thin aluminum strips, especially for quick jobs.
How do I maintain Trim Strip long-term?
Neglect can make even the best aluminum trim strip lose its shine.
To maintain aluminum trim strips, clean them regularly with mild detergent, avoid abrasive pads, and check for loose sections to repair them quickly.

I make a habit of wiping trim strips during regular cleaning. Dirt and dust can build up along edges, especially in kitchens and bathrooms. Once a month, I run a finger along the edge to check for movement. If I find a loose spot, I fix it before it gets worse.
Long-Term Care Tips
- Use mild soap and warm water for cleaning.
- Avoid steel wool or harsh scrubbing pads.
- Dry after cleaning to prevent water spots.
- Check joints and corners for gaps.
- Touch up scratches with paint or polish.
- Replace damaged sections instead of patching.
If the trim is anodized, I avoid strong chemicals, as they can dull the finish. For painted trims, a gentle polish can restore gloss. In high-moisture areas, I make sure there is good ventilation to prevent corrosion.
Using mild soap and warm water is the best way to clean aluminum trim strips.True
These cleaners remove dirt without damaging finishes.
Steel wool is a good tool for regular cleaning of aluminum trim strips.False
Steel wool can scratch and damage aluminum surfaces.
Conclusion
Aluminum trim strips are simple to install but make a big difference in durability and appearance. Choosing the right type, preparing surfaces, using the right tools, and maintaining them well ensures they last for many years.

