
Opas laattojen välikappaleisiin: All You Need To Know?
Laattoja asennettaessa epätasaiset raot tai väärin kohdistetut kulmat voivat pilata viimeistelyn. Laattojen välilevyt auttavat varmistamaan täydellisen symmetrian ja säästävät sekä aikaa että rahaa.
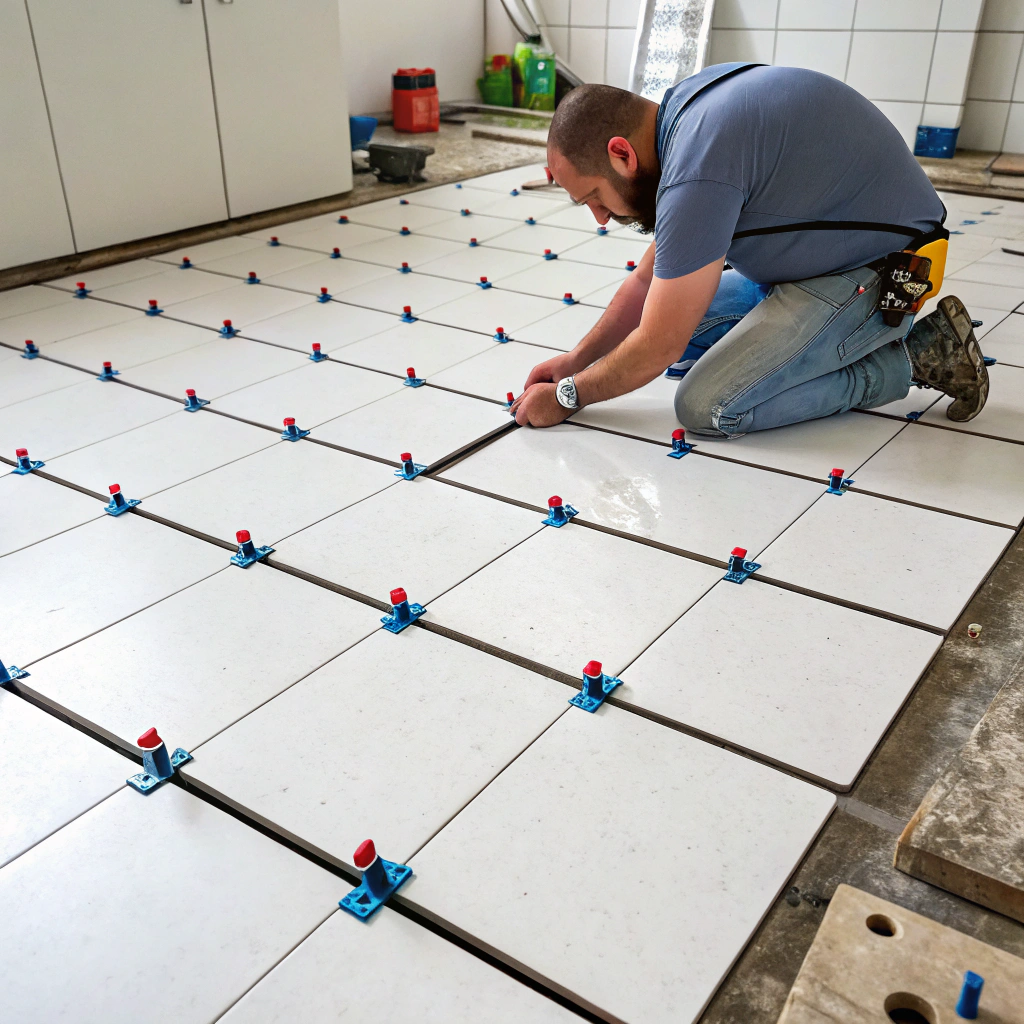
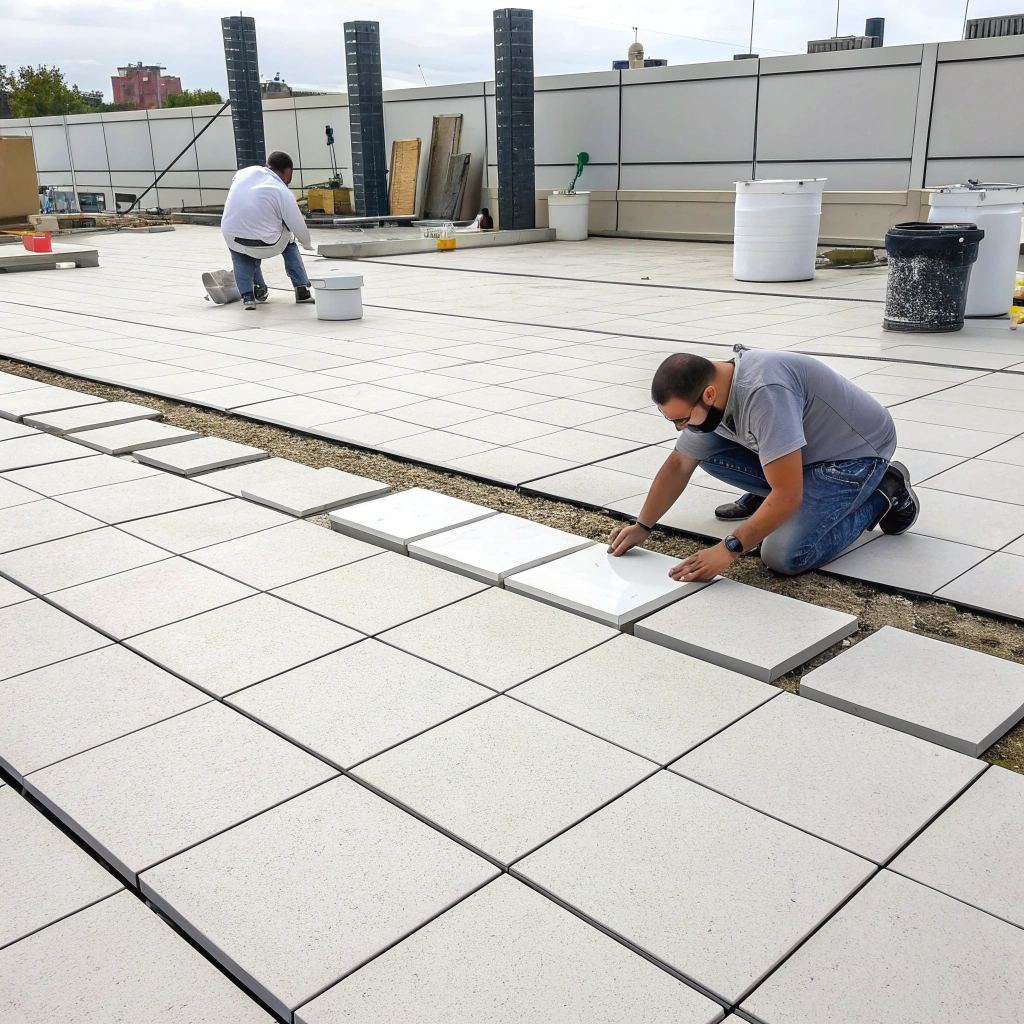
Laattojen välikappaleet ovat pieniä muovikappaleita, joita käytetään laattojen välissä tasaisen etäisyyden säilyttämiseksi, jolloin lopputulos on ammattimaisen näköinen. Ne varmistavat myös yhtenäiset laastilinjat ja rakenteellisen eheyden.
Useimmat laatoitusvirheet johtuvat tämän pienen työkalun ohittamisesta. Tässä oppaassa selvitän, mitä laattojen välikappaleet ovat, miten niitä käytetään ja milloin niitä voi jättää käyttämättä.
Mitä ovat laattojen välilevyt ja miksi niitä käytetään?
Laatta-asennukset voivat mennä pahasti pieleen ilman tarkkuutta. Epätasaiset laatat, vinot linjat ja hankalat raot eivät ainoastaan näytä epäammattimaisilta vaan myös heikentävät koko laatoituspintaa.
Laattojen välikappaleet ovat välttämättömiä työkaluja, jotka auttavat pitämään laattojen välit tasaisina laastin, linjauksen ja pitkäaikaisen kestävyyden kannalta.

Laattojen välikappaleet on yleensä valmistettu kovasta muovista. Niitä on eri kokoisia ja muotoisia, kuten T-muotoisia, ristikkäisiä tai kiilamaisia. Käytän niitä aina, kun asennan laatat, olipa kyseessä sitten kylpyhuoneen seinä tai keittiön lattia.
Laattojen välilevyjen edut
- Johdonmukaiset laastilinjat: Välikappaleet varmistavat, että kaikki liitokset ovat yhtä leveät.
- Kohdistuminen: Pitää laatat suorassa linjassa.
- Ajan säästö: Vähentää virheellisestä kohdistuksesta johtuvaa jälkityötä.
- Esteettinen laatu: Luo puhtaamman ja ammattimaisemman lopputuloksen.
- Kestävyys: Oikeat välit vähentävät laajenemisesta tai siirtymisestä johtuvaa halkeilua.
Laattojen välikappaleiden tyypit
| Välikappaleen muoto | Paras | Kuvaus |
|---|---|---|
| Cross | Neliö- tai ruudukkoasettelut | Sijoitetaan neljän laatan risteyskohtiin. |
| T-muotoinen | Tiilikuvioiset laatat | Käytetään, kun laatat on sijoitettu porrastetusti |
| Kiila | Epätasaiset pinnat | Hyödyllinen laattojen tasoittamiseen seinillä tai epäsäännöllisillä alustoilla. |
Oikeanlaisen välikappaleen valinta riippuu laattamallista. Käytän usein poikittaisia välilevyjä vakiokuvioihin ja kiiloja, kun laatoitan pystysuoraan tai epätasaisille seinille.
Laattojen välilevyt auttavat luomaan yhtenäiset ja ammattimaisen näköiset laastilinjat.Totta
Ne varmistavat, että kaikki laatat on sijoitettu tasaisesti, mikä johtaa tasaisiin laastilinjoihin.
Laattojen välilevyt ovat valinnaisia, eivätkä ne vaikuta laatan kestävyyteen.False
Epäjohdonmukaiset välit ilman välilevyjä voivat johtaa rakenteellisiin heikkouksiin ja laattojen halkeamiin ajan myötä.
Mikä välikoko on ihanteellinen eri laatoille?
Väärän välikoon valitseminen voi johtaa joko liian suureen laastimäärään tai hyvin kapeisiin viivoihin, jotka halkeilevat ajan myötä.
Ihanteellinen välikappaleen koko riippuu laattatyypistä, sijainnista ja muotoilumieltymyksistä - suuremmat laatat tarvitsevat usein leveämpiä välejä, kun taas pienemmät laatat voivat käyttää kapeita välikappaleita.

Kun työskentelen projektin parissa, sovitan välilevyjen koot laattaformaattiin ja haluamaamme visuaaliseen lopputulokseen. Tässä on nopea erittely yleisimmistä mitoista ja niiden käyttötarkoituksista.
Yhteinen laatta välilevyjen koot
| Välikappaleen koko (mm) | Suositeltava laatta tyyppi | Yleiset käyttötarkoitukset |
|---|---|---|
| 1-2 mm | Pieni keraaminen/mosaiikki | Kylpyhuoneen seinät, backsplashes |
| 3 mm | Keskikokoiset laatat | Lattiat, suihkun seinät |
| 5 mm | Suuri posliini/kivi | Ulkolaatoitus, teollisuuslattiat |
Harkitse laastityyppi
Eri laastimateriaalit laajenevat eri tavoin. Jos käytät esimerkiksi epoksilaastia, tarvitaan vähintään 3 mm:n rako. Sementtipohjainen laasti voi toimia hyvin 2 mm:n väleillä.
Vinkkejä välikappaleen koon valintaan
- Visuaalinen mieltymys: Suuremmissa raoissa näkyy enemmän laastia; tämä vaikuttaa kokonaisuuteen.
- Laattamateriaali: Luonnonkivilaatat tarvitsevat usein laajempia välejä kokovaihteluiden vuoksi.
- Pinnan sijainti: Märkätilat, kuten kylpyhuoneet, saattavat tarvita leveämpiä välejä, jotta saumauslaastin tiivistys olisi parempi.
Henkilökohtaisesti olen sitä mieltä, että 3 mm:n välikappaleet tarjoavat parhaan tasapainon useimpiin sisätiloissa käytettäviin asuntosovelluksiin.
Suuremmat laatat vaativat yleensä suurempia laattojen välikappaleita.Totta
Suuremmat laatat tarvitsevat enemmän laastiväliä, jotta ne voivat mukautua luonnolliseen laajenemiseen ja supistumiseen.
Voit käyttää samaa välikokoa kaikille laattatyypeille.False
Eri laatat ja alueet tarvitsevat eri kokoisia välikappaleita optimaalisen suorituskyvyn ja ulkonäön saavuttamiseksi.
Miten laattojen välilevyt asetetaan ja poistetaan oikein?
Saatat ajatella, että välilevyn asettaminen on vain sen asettamista laattojen väliin. Väärin tekeminen voi kuitenkin vaikuttaa asetteluun tai vaikeuttaa poistamista.
Jos haluat käyttää laattojen välilevyjä oikein, aseta ne kahden laatan kohdistamisen jälkeen, varmista, että ne ovat samassa tasossa laattapinnan kanssa, ja poista ne ennen kuin liima kuivuu kokonaan.
Teen sen yleensä näin:
Vaiheet laattojen välikappaleiden asettamiseen
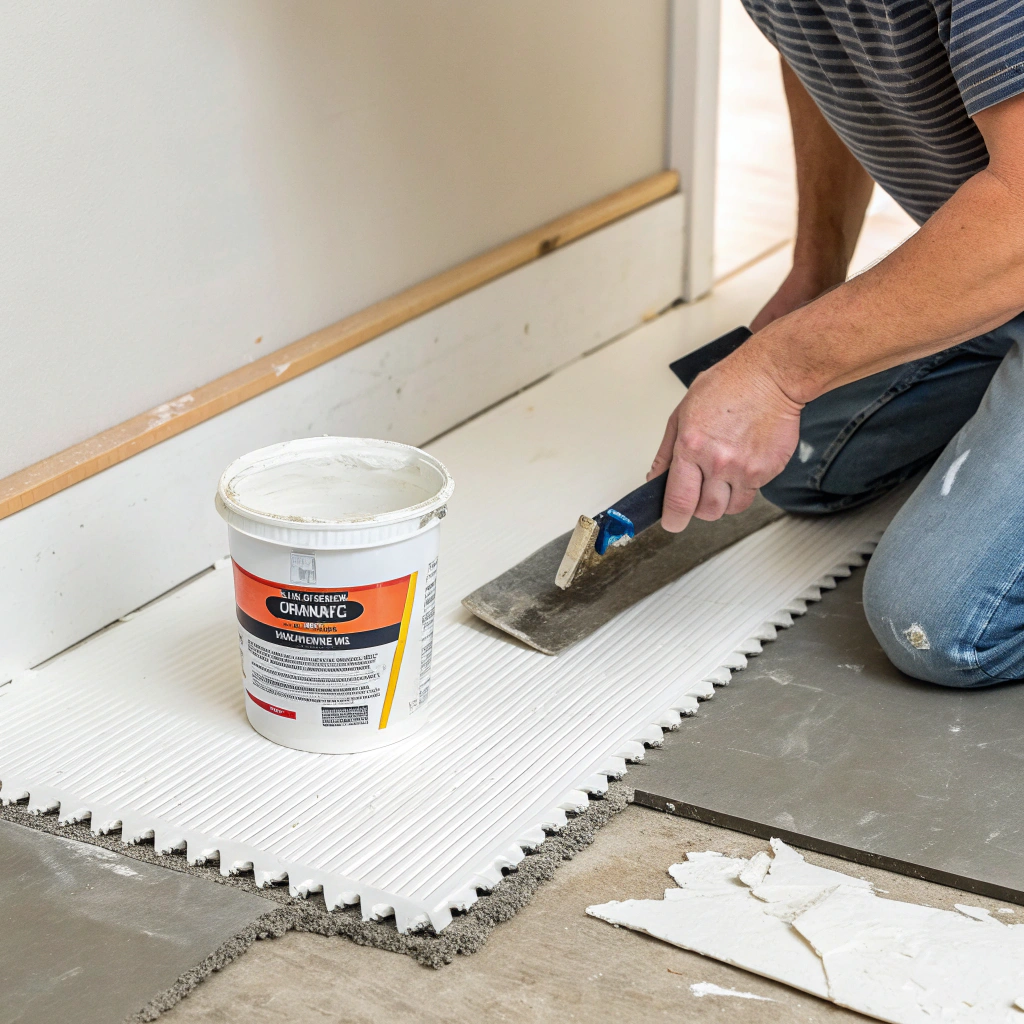
- Levitä ohennusliimaa: Levitä pinnalle tasaisesti hammaslastalla.
- Aseta ensimmäinen laatta: Aseta se tukevasti ja tarkista taso.
- Lisää välilevy: Aseta yksi tai kaksi välikappaletta laatan sijainnista riippuen (risti- tai reunapinta).
- Jatka laatoitusta: Aseta seuraava laatta välilevyä vasten ja säädä kohdistus.
- Toista: Tarkista taso ja etäisyys usein.
Miten poistaa laatta välilevyt
- Odota 24 tuntia laatoituksen jälkeen tai kunnes liima on lähes kuiva mutta ei täysin kovettunut.
- Vedä välikappaleet varovasti ulos pihdeillä tai käsin.
- Puhdista raot harjalla laastin saumausta varten.
Ammattilaisten vinkit
- Älä työnnä välilevyjä liian syvälle; niiden pitäisi olla helppo irrottaa.
- Seinälaattojen kohdalla kannattaa harkita kiilavälikappaleiden käyttöä laattojen korkeuden säätämiseksi.
- Tarkista linjaus säännöllisesti laservaa'an tai liituviivan avulla.
Asianmukaisen poiston ohittaminen voi aiheuttaa ongelmia laastin laastin laastin levittämisen aikana, kuten kokkareita tai epätasaista levitystä.
Laattojen välilevyt on poistettava ennen saumauksen aloittamista.Totta
Niiden jättäminen sisään voi häiritä laastilinjoja ja heikentää lopullista pintaa.
Laattojen välikappaleet on liimattava pysyvästi laattojen väliin.False
Ne ovat tilapäisiä apuvälineitä, ja ne on poistettava laattojen kiinnityksen jälkeen.
Voitko laatoittaa ilman välilevyjä - milloin se on hyväksyttävää?
Jotkut perinteiset rakentajat jättävät välikkeet pois. He väittävät, että kokeneet laatoittajat osaavat katsoa välejä silmämääräisesti ja säätää niitä tuntuman perusteella. Mutta onko tämä luotettavaa?
Voit laatoittaa ilman välilevyjä vain, jos käytät tasoitettuja laattoja hyvin tasaisilla pinnoilla, ja vain, jos sinulla on paljon kokemusta laattojen asettelusta.
Joissakin harvoissa tapauksissa voit jättää välikappaleet pois:
Milloin on ok jättää laattojen välikappaleet väliin
- Oikaistut laatat: Nämä on leikattu tehtaalla tarkkojen mittojen mukaan ja niissä on terävät reunat.
- Dry Fit Practice: Koristeellisiin seiniin, joissa laastijäljet ovat minimaaliset tai ei-toivotut.
- Ammattitaitoinen työvoima: Ammattimaiset laatoittajat, joilla on vuosien harjoittelu, voivat saavuttaa tasaisen etäisyyden silmämääräisesti.
Mutta tässä on ongelma. Pienikin virheellinen suuntaus voi sekoittaa koko kuvion. Olen joutunut korjaamaan projekteja, joissa asiakas on vaatinut, ettei välilevyjä käytetä. Se maksoi ylimääräisiä materiaali- ja työkustannuksia.
Välikappaleiden käyttämättä jättämisen riskit
- Epätasainen laasti linjat
- Kaltevat tai vinot laatat
- Paisuntasaumojen puuttumisesta johtuva halkeilu
- Laastin värjäytyminen epätasaisesta syvyydestä
Tuomio
Vaikka se on mahdollista, suosittelen harvoin laatoitusta ilman välilevyjä. Riski ei ole sen arvoinen, ellei kyseessä ole hyvin valvotut olosuhteet.
Ainoastaan suoristetut laatat mahdollistavat tietyissä tapauksissa laatoituksen ilman välilevyjä.Totta
Niiden tarkat reunat mahdollistavat minimaalisen laastilinjan ja tarkan silmämääräisen välyksen.
Laattojen välikappaleiden käyttö on vain aloittelijoille eikä se ole välttämätöntä ammattilaisille.False
Jopa kokeneet laatoittajat käyttävät välilevyjä tarkkuuden ja nopeuden vuoksi.
Päätelmä
Laattojen välilevyt saattavat olla pieniä, mutta niillä on suuri merkitys. Olitpa sitten laatoittamassa lattioita tai seiniä, sisällä tai ulkona, oikean välikappaleen käyttö takaa tasaisen, kestävän ja kauniin lopputuloksen.


